Manker LAD III Review
Review
Manker LAD III · Published: 2026-06-04
Hands-on review of the Manker LAD III 4000K high CRI flat EDC flooder.
Specifications
| LED / emitter | Dual Luminus SST20 4000K high CRI |
|---|---|
| Output | 888 lm Turbo at turn-on (Tim McMahon); 720 lm claimed |
| Throw | 64 m ANSI measured (Turbo); 53 m claimed |
| Battery | Built-in 500 mAh LiPo |
| Driver | Regulated output with active thermal stepdown |
| User interface | Side e-switch; moonlight group, ramping, Turbo shortcut, engineering mode |
| Size | 64×26×14 mm (approx.) |
| Weight | 34 g |
| IP rating | IP67 |
| Charging | USB-C (C-to-C supported) |
Quick facts
- Type: Flat EDC flooder
- Version reviewed: 4000K high CRI (dual SST20 + TIR optic)
- Battery: Built-in 500 mAh LiPo, USB-C charging
Manker LAD III 4000K high CRI: tiny EDC flooder with rosy tint and real moonlight
An Accurate Review by AccurateJazz
TL;DR
The Manker LAD III 4000K is a compact flat flood light that works especially well at close range. The beam is smooth, uniform, very floody, and has no noticeable hotspot, which makes it great for looking inside a car, checking a bag, closet, or basement. It also has a truly pleasant slightly rosy tint, excellent color rendering, a surprisingly strong turbo burst, and one of my favorite things about it is the moonlight: it is genuinely, properly low, which is still too rare in off-the-shelf lights. I don’t see it as my always-on-keyring light. It is a bit large for that role, and the button/lockout design makes accidental activation a real concern.
What it is
The LAD III, or LAD 3, is Manker’s current flat rechargeable mini-EDC light. Mine is the 4000K high CRI version with dual SST20 emitters, a TIR optic, USB-C charging, and a built-in 500 mAh battery.
There are two versions. Both use dual SST20 emitters, but one is the 6500K cool white low CRI version with higher output, and the other is the 4000K high CRI version reviewed here. Personally, I would strongly recommend considering the 4000K high CRI version first. For this kind of small close-range flood light, better tint and color rendering matter much more to me than chasing the slightly higher output.
Both versions are available in black or olive green.
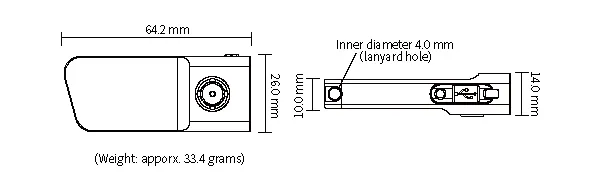
On paper, it looks like a keychain light, and it can be used that way. But I don’t personally use it as my main keychain light. I tried it, but on my actual keys I still prefer something smaller and throwier.
I use the LAD III mainly around the house. It is tiny and lightweight (34 g) and the 4000K high CRI beam is so pleasant that I keep reaching for it over many other lights. The tint is clean, the color rendering is appealing, and Turbo is bright enough for quick real-world tasks. I also like that Turbo stays above 800 lm for roughly the first 40 seconds, which is often all I need.
That is what makes the LAD III interesting to me: it is not just an emergency keychain light. It is a tiny close-range flooder that is bright, practical, and convenient enough that I actually want to use it.
Beam and tint
This is the main reason I like the 4000K version.
The beam is extremely floody, but what I especially like is how smooth and uniform it is. There is no obvious central hotspot at all. It just creates a broad, even pool of light in front of me.
Because there are two LEDs side by side, the beam is not perfectly round. It is more of an oval beam shape. I did not notice any artefacts in practical use.
The beam shape is excellent for close-range tasks: looking inside a car, checking the trunk, searching a bag, looking through a closet, or digging through stuff in the basement. It is very practical. It is the kind of beam that makes sense indoors, where I often want to light up the whole immediate area rather than aim at one distant object.
The tint is unusually good for a mainstream light. In his excellent and very detailed review, Tim McMahon measured the 4000K version at 3829K, CRI 98.3 and DUV -0.0029 on Low, and 3789K, CRI 96.9 and DUV -0.0035 on Turbo. That means the beam is slightly rosy, which is ideal for this CCT. That matches my subjective tint-snob impression: the tint looks excellent, the color rendering is outstanding, and the overall light quality is much more appealing than typical greenish non-enthusiast LEDs.
Tim’s full review is here and is worth reading if you want the detailed graphs and measurements: Manker LAD III Neutral White EDC Torch Review by Tim McMahon
Performance
For something this small, Turbo looks surprisingly impressive.
Tim measured Turbo at 888 lm at turn-on. After roughly 45 seconds, it steps down to a well-regulated 271 lm and stays essentially flat there, lasting about 36 minutes in total.
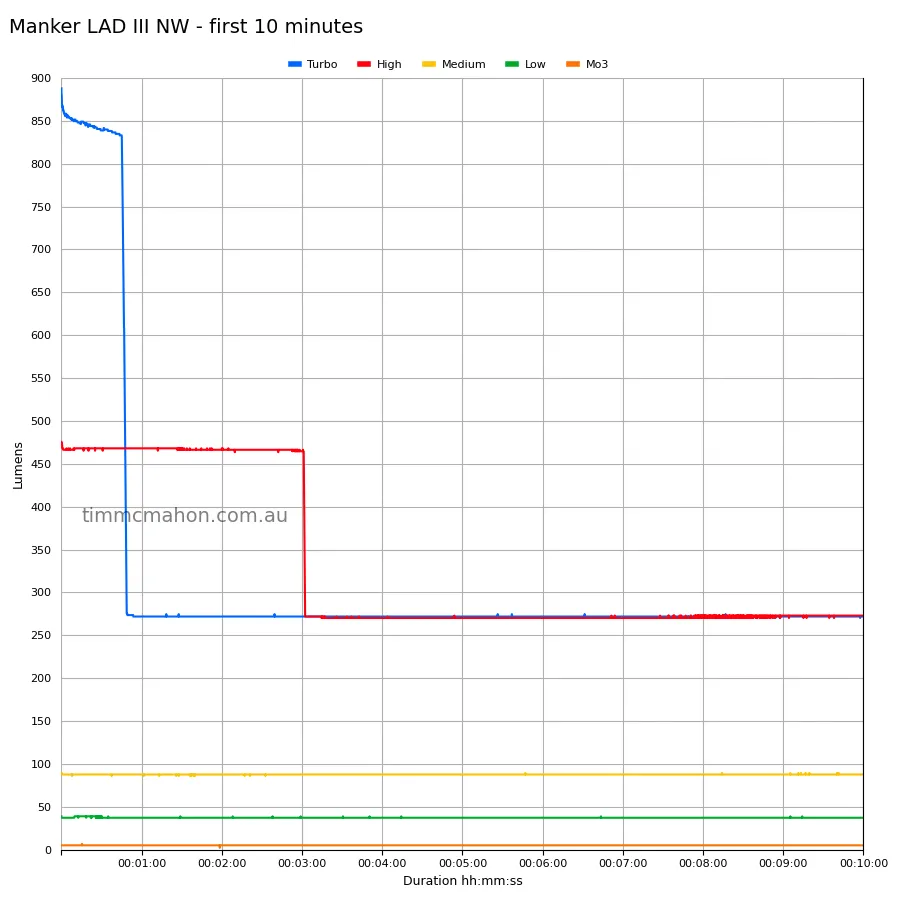
So the practical picture is clear: Turbo gives a real “wow, that’s bright for the size” moment, then the light steps down through active heat management to a thermally sustained level that is still impressive for a body this small.
- High starts at 475 lm and steps down to the same sustained level after 3 minutes.
- Medium holds 87 lm for 2 h 18 min.
- Low holds 38 lm for 4 h 37 min.
- Moonlight modes can run for days.
That is exactly what I expect from this form factor. If you want higher sustained output, use a much bigger light with more thermal mass and surface area. If you want a tiny light that can briefly punch above its weight and then remain useful, the LAD III makes sense.
In real use, I often turn it on in Turbo when I need to find something quickly. Usually I find what I need within the first half minute, before the stepdown even matters. That is where the LAD III feels much more capable than its size suggests.
I think the default mode spacing would be better if High started closer to the sustained level of around 271 lm.
I would not buy it for throw. It has very little reach, especially compared with throwy lights. Tim measured 64 m ANSI throw on Turbo at 30 seconds, which is actually better than Manker’s claimed 53 m, but it still illustrates the point: this is fundamentally a flood light, not a thrower.
Moonlight
The moonlight mode is one of the best parts of the light.
Manker gives three moonlight levels, officially 0.2 / 1 / 3 lumens. The lowest level is genuinely, properly low. That may sound like a small detail, but I think it matters a lot. Many mainstream lights still make their lowest mode too bright for dark-adapted use, nightstand use, or moving around in the dark without waking yourself up.
Moonlight can be configured even lower through the Hidden Engineering mode, covered below in the UI section. It can be set so low that it is barely visible in the dark. This is the first mainstream light I have seen that can compete with the ultra-low moonlight levels possible with Lume X1 drivers.
This is one of the things I appreciate most about the LAD III. The moonlight is actually low enough to be useful in real darkness.
There is one annoyance: the blue switch battery indicator can be visually aggressive when your eyes are dark-adapted. In moonlight, the blue button light can draw more attention than the main emitters. My workaround is to cover the button with my thumb for the first 10 seconds when the battery indicator is active after turning the light on.
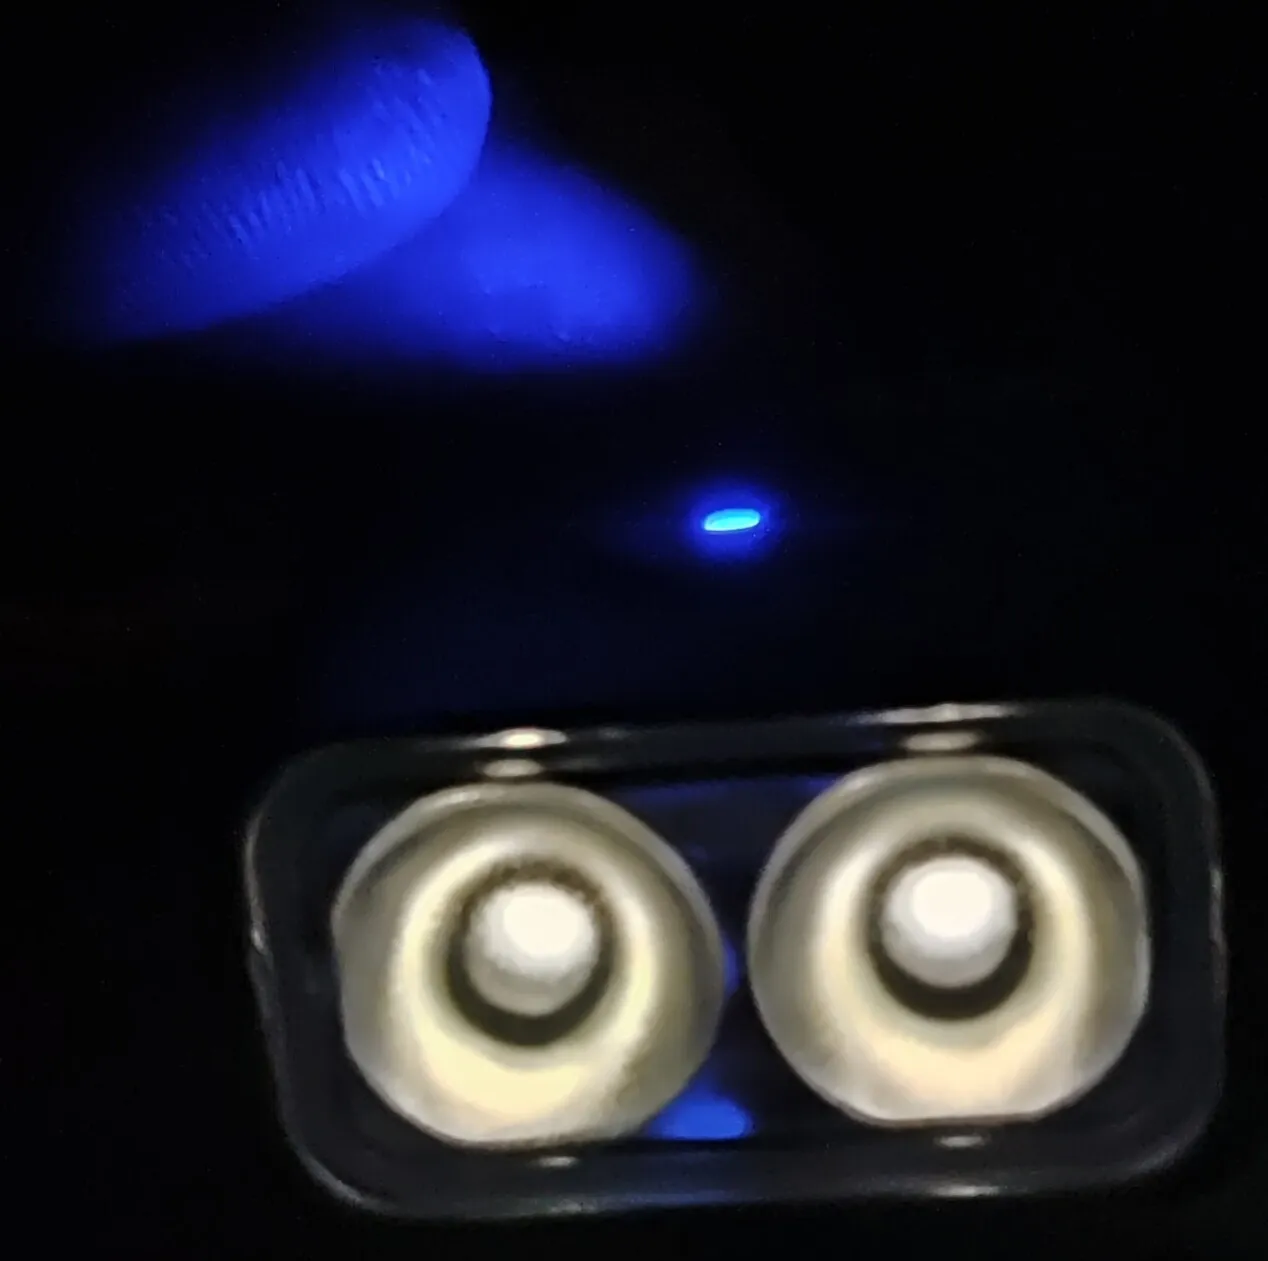
I would prefer the switch LED to stay off in the Moonlight modes.
User interface
The UI is mostly excellent.
Things I like:
- hold from off for the lowest moonlight,
- click from off for the memorized Main group,
- hold to ramp up within a group,
- double click for Turbo,
- battery-status indication in the switch,
- multiple moonlight levels,
- programming mode for precise configuration of Moonlight levels,
- standard shortcut logic that feels familiar if you like enthusiast UIs.
The interface feels familiar if you are used to the Anduril/Sofirn/Wurkkos/Skilhunt UI. That makes the UI easy to learn.
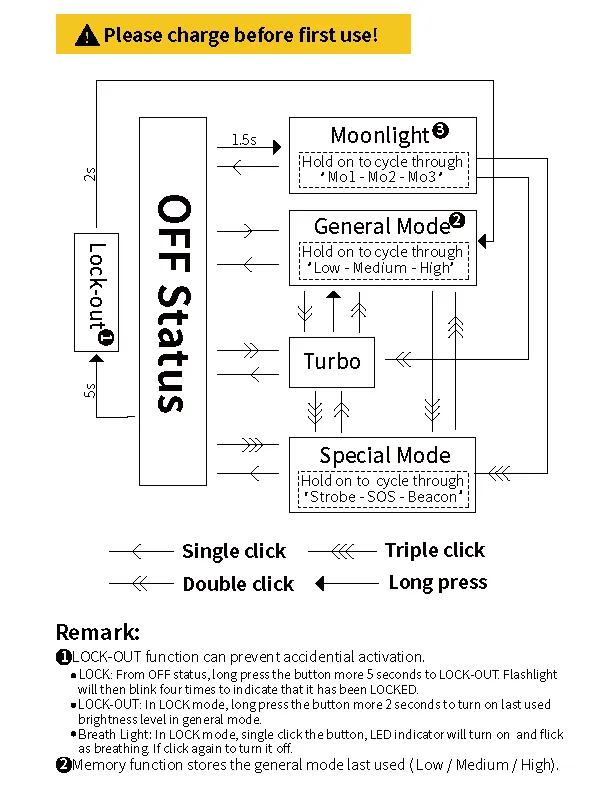
My main complaint is that there is no ramp up from the Moonlight group into the Main group. If I enter the Moonlight group and then decide I want more light than the third moonlight mode, I cannot simply keep increasing brightness into the normal levels. Holding only cycles within the group. To get into the Main group, I need to turn the light off and turn it on again.
That is not a fatal flaw, but it does break the flow.
Button indicator and locator LED
I like having a battery indicator in the button, but I wish the switch LED were more configurable.
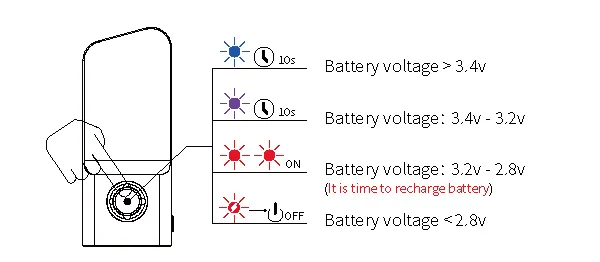
The light can show a breathing switch LED while locked, which is useful because it helps you find the light in the dark. In practice, it works as a locator mode.
The problem is that the locator color is tied to battery voltage. As shown in the manual, the switch LED is blue above 3.4 V, purple from 3.4 V to 3.2 V, and red below 3.2 V. That makes sense as a battery indicator, but it also means the locator LED is usually blue when the battery is healthy.
That is not ideal for dark-adapted use. Blue is the last color I want glowing on a bedside or night-use light.
Ideally, I would like the locator function to be separate from the battery-status color. I would like to enable a locator LED even when the light is not locked, and choose red as the locator color regardless of battery voltage.
Button and lockout
This is the biggest practical caveat.
The button protrudes slightly from the body. It is not extremely exposed, but it is exposed enough that accidental activation is plausible. If I place the light button-down on a table and press the body, the button activates and the light turns on.
This is not only theoretical. When I carried it unlocked in my pocket, it did turn on by accident. That is not something I want from an EDC light.
There is no mechanical lockout option due to the built-in battery.
There is a software lockout. Locking is done by a long hold, which I measured at about 4 seconds. The light first enters moonlight; if I keep holding, it eventually locks and confirms with four blinks. In the locked state, pressing the button does not turn on the main emitters, but switches on/off the locator mode, which is the breathing blue LED in the button.
The problem is unlocking. Unlocking is also done by holding the button, which I measured at about 1.5 seconds. Unlocking turns the light on in the last used Main group output. For pocket or bag carry, that feels too easy to trigger accidentally. If the light is pressed against something for long enough, it can unlock by accident.
I would strongly prefer an Anduril-style lockout: four clicks to lock, four clicks to unlock. A four-click sequence is much less likely to happen accidentally than a long press.
For me, this does not ruin the light, because I mostly use it at home. But if someone wants to carry it loose in a pocket, bag, or on a busy keyring, the lockout behavior is worth taking seriously.
Hidden Engineering mode
The Hidden Engineering mode is a great feature, and it is one of the more enthusiast-friendly parts of the LAD III. It allows the default brightness levels in the Moonlight group to be adjusted. I wish it were available for the Main group as well.
It works like this: turn the light on, select the level you want to adjust, then click five times and hold on the sixth click for about five seconds. The button indicator flashes red to show that you are in engineering mode. A single click increases the brightness, a double click lowers it, and a press-and-hold saves the selected brightness.
That is a genuinely cool feature in a mainstream light. But be careful with it, because there is no factory reset.
Size and carry
The flat shape is very nice. The thin part is only 10 mm thick. It makes the light feel smaller than a round light of similar volume.
But as a literal keychain light, I think the size is borderline. It is thin, but it is still fairly wide and fairly long. To my eyes, it is roughly in the same visual size category as a car key, just thinner. That does not make it bad, but I would not call it a “forget it’s there” keychain light.
The flat body also has one small ergonomic advantage: it is easy to hold in your teeth for a quick hands-free moment. I would not treat that as a main feature, obviously, but in an emergency it works better than many small round lights.
So for me the category is:
- excellent lightweight mini light,
- compact high CRI flooder,
- backup light,
- usable but larger keychain light,
- but not my ideal always-on-keyring light.
Build quality, finish and fidget factor
The finish feels excellent. The machining, anodizing, button, and overall fit all make it feel like a proper little enthusiast light rather than a cheap keychain gadget.
This is subjective, but I also enjoy fidgeting with it. The flat body and compact shape make it satisfying to handle, flip around in the hand, and absent-mindedly play with. That obviously is not a core flashlight feature, but it does make the light feel nicer to own and use.
The rubber USB-C port cover is well executed too. It stays closed securely and does not randomly open in my pocket. When opened, it can be rotated out of the way, so it does not fight the cable while charging.
Battery and charging
Normally, I am very skeptical of built-in batteries. They reduce the long-term lifespan of a device, and they remove the option to swap an empty cell for a fully charged one. But in a light this small, I can accept it.
The built-in 500 mAh LiPo battery lasts long enough for my normal use. Obviously, this is still a tiny light, and the runtime at the highest sustained output is only about 36 minutes. But compared to many other tiny lights, the capacity feels generous.
Charging is well implemented. A full charge takes around 40 minutes, and USB-C to USB-C charging works.
No magnet
The LAD III does not have a magnet. I sometimes miss one.
But I would not call the lack of a magnet a flaw. It is a design decision. Some people would love a magnet here. Other people will prefer that their keychain light does not stick to keys, tools, shelves, or random metal objects.
Pros / cons (summary)
Pros:
- unusually pleasant 4000K high CRI beam for a mainstream light
- slightly rosy tint, not the typical greenish white look
- smooth, uniform flood
- genuinely low moonlight
- strong short-term Turbo for the size
- USB-C charging
- configurable Moonlight levels through the Hidden Engineering mode
- good build quality and finish
- flat, compact shape
Cons:
- borderline large for an always-on-keyring light
- very limited throw
- no replaceable battery
- protruding button can cause accidental activation
- long-press lockout/unlock is not as pocket-safe as I would like
- blue switch indicator can be too distracting in dark-adapted moonlight use
Summary: At around $26, the 4000K version offers strong value if you care about tint, real moonlight, compact flood, USB-C charging, and configurable Moonlight levels. I would skip it if your priorities are throw, replaceable batteries, or a lockout system that is hard to trigger accidentally. For me, the LAD III 4000K is one of the rare tiny lights where beam quality and UI are both real reasons to buy it.
Sources
- Tim McMahon: Manker LAD III Neutral White EDC Torch Review
- Manker official specifications: LAD III USB-C Rechargeable EDC Flashlight
Disclosure
Banggood provided this light free of charge for review. You can find the Manker LAD III on Banggood. This is not an affiliate link.